It is with a bittersweet mix of emotions that we gather today to pay our respects to one who has brought great winter joy to three little boys. Yes, on this, the next-to-last day of February--and the end of a three-month period of cold, snowy, icy weather here in the northern Ozarks--we bid adieu (we hope) to Frosty the Snowman.
Beenie, Heero, Zoomie, and I wish him nothing but the best as we watch him go thumpity-thump-thumping his way over the hills of snow and out of our lives, at least for a while. It is time for him to move on to a place where he can be more--well--appreciated. Our spirit of hospitality for substances cold and white is waning a bit. Around here, we are ready for spring.
Don't get me wrong--we loved having Frosty around at first. He was a great playmate for Heero, Beenie, and their neighbor friend as he joined them for some front-yard games. He never started a fight or broke a rule, and remained cool under all circumstances.
Then, he certainly proved inspirational as he came to life on Zoomie's breakfast plate on New Year's morning, complete with bacon arms and strawberry buttons. Frosty, it turns out, is nothing if not versatile.
Finally, Beenie captured Frosty's jolly, happy soul in this mixed-media piece displayed on the bulletin board outside his first-grade classroom.
Accompanying this realistic likeness were directions for building a snowman, which, in Beenie's own handwriting and vocabulary, went like this:
1. Make three ball's out of snow.
2. Add tow eye's made out of coal.
3. Add a carit for the nose.
4. Add a hat.
5. Add coal for the mowth.
Certainly, Frosty, your magical presence brightened our winter with a blast of fun and a spark of creativity. We know that you are not merely a fairy tale, as rumored, and that you came to life for many kids just as you did for these boys.
But Frosty, you should probably head for the streets of some town very far north of here and do some dancing around up there. March is just a day away, and, with our greatest blessing, it is time for you to go.
Showing posts with label snowman. Show all posts
Wednesday, February 27, 2019
Sunday, January 26, 2014
A New Way To Build a Snowman
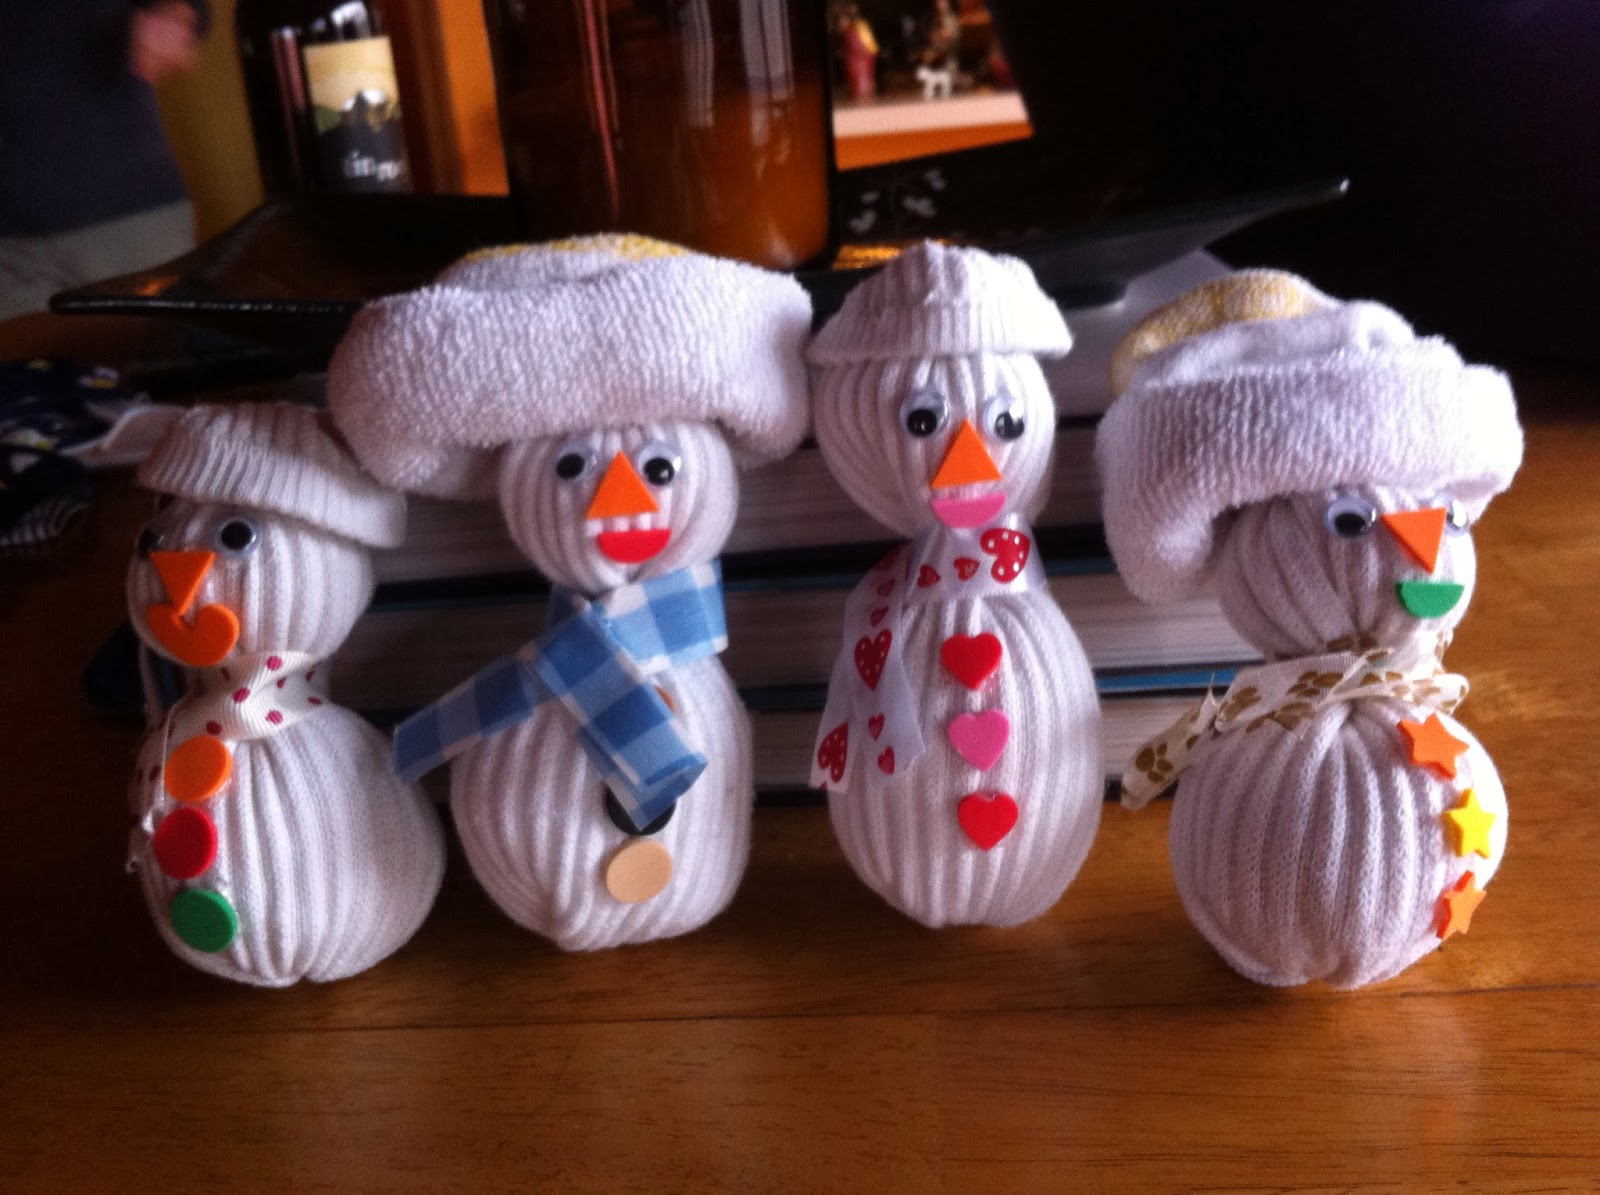
The kids and I thought the name "Frosty" had been much overused for snowmen. That's why our snow people, pictured below, are named Polka Dot, Checkerboard, Valentina, and Star Boy. As you can see, their names are derived from the patterns featured on their scarves, buttons, or both.
Furthermore, it wasn't a huge snowfall that brought this handsome snow family into existence; it was the fact that Pa-pa had some old socks to throw away and the kids and I some time on our hands on a Saturday afternoon in January.
Before heading to the kids' house last weekend, I packed a bag with four old socks, a pair or scissors, a partial bag of leftover fiber-fill, my hot glue gun, some assorted scraps of ribbon, a handful of rubber bands, and some odds and ends of foam pieces and googly eyes from old arts and crafts kits.
In my mind's eye was a picture I had seen on Facebook showing how to make little sock snowmen in a simple five-step process. With a little tweaking for the sake of practicality and a few changes to accommodate already-on-hand materials, it was possible for Sooby, Pooh, Bootsie, and me to create our snow creatures well within the nap span of their eighteen-month-old brother (which, I'm sure, streamlined our process considerably.)
In a nutshell, here are directions for making one of these snow people:
Because we used fiber-fill rather than the suggested rice, our snow people don't stand up on their own and are more like dolls than decorations. However, with the kids aged 6, 4, 3, and 1, I think this is most likely a practical substitution. Otherwise, I am sure we might have been sweeping up rice before the day was out.
I think the kids had fun making and naming their snow dolls. They seem to be the perfect size for little hands. They are perfect for playing with puppet-show style or snuggling with at bedtime.
The only bad thing, as far as I can tell, is that I didn't make one for myself. As cute as the kids' snow people turned out, I am thinking Pa-pa had better keep a close eye on his sock drawer.
Furthermore, it wasn't a huge snowfall that brought this handsome snow family into existence; it was the fact that Pa-pa had some old socks to throw away and the kids and I some time on our hands on a Saturday afternoon in January.
Before heading to the kids' house last weekend, I packed a bag with four old socks, a pair or scissors, a partial bag of leftover fiber-fill, my hot glue gun, some assorted scraps of ribbon, a handful of rubber bands, and some odds and ends of foam pieces and googly eyes from old arts and crafts kits.
In my mind's eye was a picture I had seen on Facebook showing how to make little sock snowmen in a simple five-step process. With a little tweaking for the sake of practicality and a few changes to accommodate already-on-hand materials, it was possible for Sooby, Pooh, Bootsie, and me to create our snow creatures well within the nap span of their eighteen-month-old brother (which, I'm sure, streamlined our process considerably.)
In a nutshell, here are directions for making one of these snow people:
- Cutting: Cut the sock in two pieces just above the place where the ribbing ends. Save the "toe" end to roll up and fashion a hat, as you see above with Checker Board and Star Boy. (Sooby and Bootsie wanted smaller, more feminine hats, so for Polka Dot and Valentina, we simply turned down the excess sock top after stuffing to create a retro "pillbox" look.)
- Stuffing: Turn the ribbed "tube" inside out, and secure a rubber band tightly around one end. Turn the tube right side out again, and stick in a handful of stuffing in the opening to create a ball shape for the snowman's body. Add another, smaller ball of stuffing for the head, and secure another rubber band at the top.
- Making Hats: Leave enough sock at the top to turn down if you are going for the pillbox. For the stocking-cap style, modeled by Checker Board and Star Boy, roll a couple "cuffs" at the cut end of the "toe" portion of the sock. Use dots of hot glue as needed to secure the hat in position on the snowman's head.
- Decorating: Glue on googly eyes, and have kids choose facial features and buttons from whatever assortment of foam pieces, buttons, etc. you have. Hot glue those on.
- Adding the Scarf: Finish with a scarf made of ribbon or fabric. Wrap and hot glue as needed to hide the rubber band at the snowman's neck.
Because we used fiber-fill rather than the suggested rice, our snow people don't stand up on their own and are more like dolls than decorations. However, with the kids aged 6, 4, 3, and 1, I think this is most likely a practical substitution. Otherwise, I am sure we might have been sweeping up rice before the day was out.
I think the kids had fun making and naming their snow dolls. They seem to be the perfect size for little hands. They are perfect for playing with puppet-show style or snuggling with at bedtime.
The only bad thing, as far as I can tell, is that I didn't make one for myself. As cute as the kids' snow people turned out, I am thinking Pa-pa had better keep a close eye on his sock drawer.
Subscribe to:
Posts (Atom)